Josh's Frogs
Why you should buy from us
Bioactive Substrate in your Dart Frog Vivarium
In the wonderful world of dart frogs, one of the key ingredients to a successful vivarium is a well put together bioactive substrate. This blog will be primarily focused on the use in a dart vivarium, but the methods, tricks, and tips are transferable to some other animals as well.
In this blog, we'll go over how to start a strong bioactive layering system. The life span of a well implemented Josh’s Frogs bioactive dart frog layering system is about 2 to 5 years, saving time and money! While going bioactive may seem difficult and even intimidating, it is incredibly easy as long as you follow all of these steps. As always, if you run into problems or questions we are always here to help!
The System
Bioactive substrates really are living, breathing mini ecosystems. It's important to set them up properly and know the different parts of the system so that you can make informed decisions to ensure the health of your vivarium. An improperly cared for layering system will cause it’s lifespan to diminish quickly. 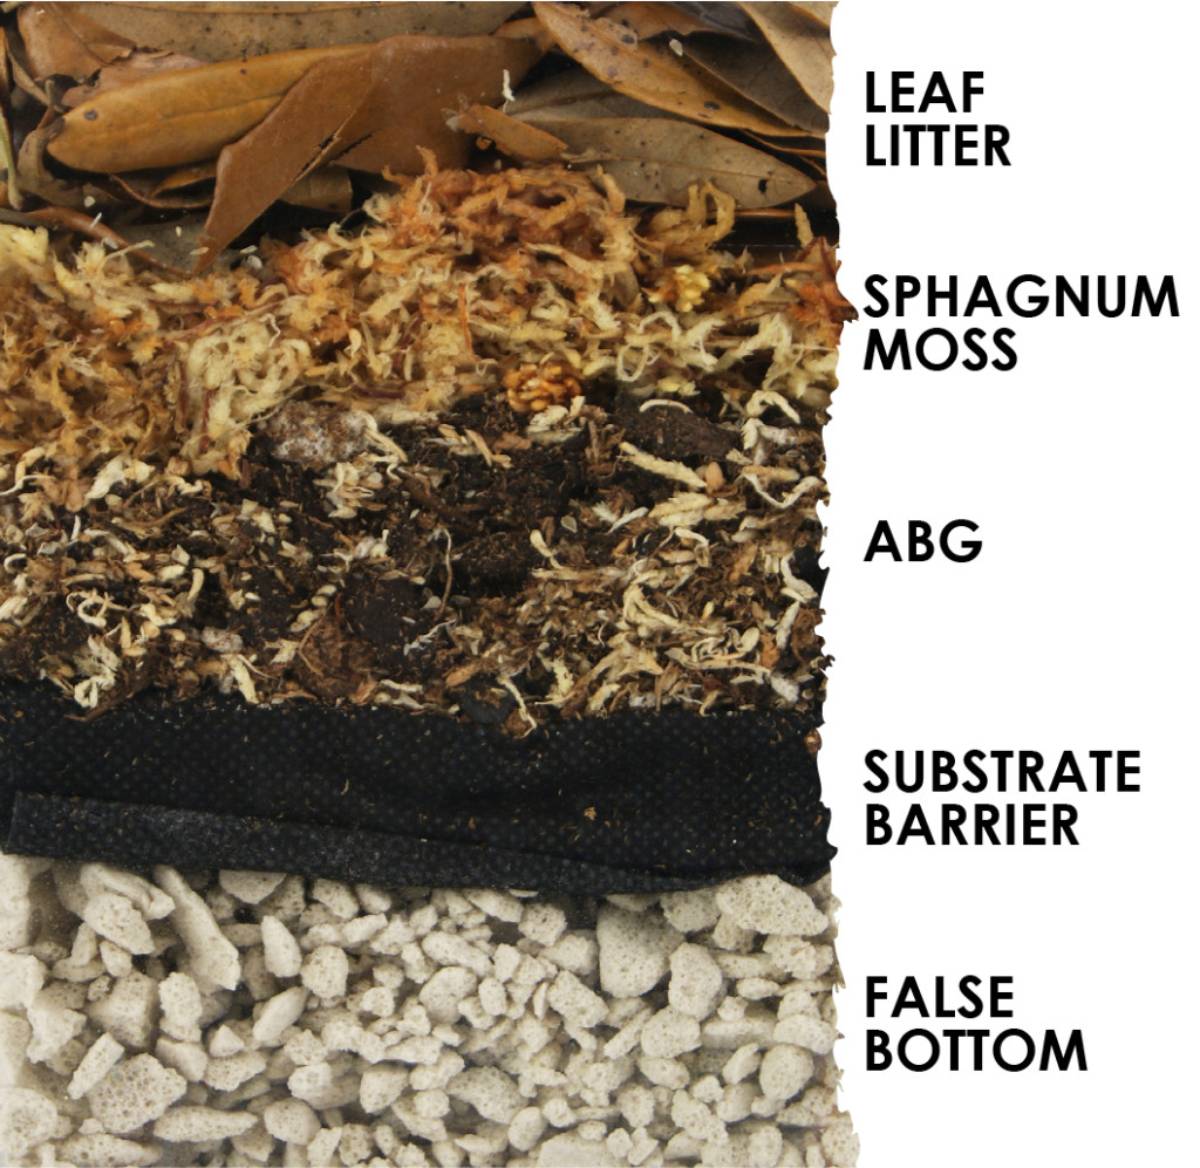
Drainage Layer
Let’s start with the foundation of this system, as any strong house needs an even stronger foundation. The drainage layer is comprised of false bottom and a small layer of water. Hydroton (also known as LECA, for 'light expanded clay aggregate') is a great choice for the false bottom or drainage layer in a vivarium. LECA is a natural product, made from heated clay. It retains moisture, provides lots of surface area for bacteria and plant roots to grow, and wicks water, which will help maintain humidity in a vivarium. Installing this important piece of system is very easy! You will want a misting device filled with RO water, a dust mask, gloves and the proper amount of false bottom.
Once you are ready to install, put on your dust mask and prepare for a small dust cloud (this process is best done outside). Pour in all of your false bottom, aiming for a layer about 2 inches deep. I like to suggest between 2 and 3 inches as it gives you a little more leeway with your water level. The more drainage layer you have, the more time you will have to notice your water level getting too high.
Now spray the false bottom down using your RO water until the dust is all settled and the false bottom is damp enough to keep the dust down. The false bottom is abrasive, so now it is time to put your gloves on. Flatten the layer of false bottom to create an even surface . Now to help start off with a steady humidity in the tank, add RO water until there is a low level of water at the bottom of the drainage layer (1/8 to 1/4 inch).
That’s it! Drainage layer installed!
Substrate Barrier
The next step is to ensure that nothing from the upper substrate layers gets into the drainage layer by installing a substrate barrier. If debris get down into the drainage layer or if the water level reaches the upper layers, it can cause blooms of harmful bacteria that can effect the health of your frog, or even cause death. With that in mind, ensure that when you are installing the barrier it is pressed tight to the walls and corners of the tank (I will give you pointers as we go).
Whether you receive your substrate barrier pre-cut or you have to cut your own, you want to make sure you always over-cut your barrier by at least an inch. Many times people will cut them to fit perfectly which I have found can lead to debris sneaking through to the drainage layer. When I'm building a tank I always over-cut my substrate barrier by at least one inch, if not several inches.
To install your substrate barrier, line it up with the center of your tank so that the edges fold up the wall a bit. Installing this barrier properly will also include steps in the ABG layer and the Sphagnum layer as well. For now all you need to do is lay it centered over the False Bottom and your mission is (mostly) complete.
ABG Mix
We get a lot of questions about our ABG mix and why it is important to use compared to other types of soil. The main reason using ABG is super important is that most soils do not drain the way ABG does. It's very important to move any excess water through the layers in a vivarium in a timely fashion. Many soils will remain waterlogged and oversaturated for too long, and this can lead to the harmful bacteria mentioned earlier.
Besides draining water well, ABG is formulated to retain the correct amount of moisture in a high humidity environment. It promotes healthy plant growth and supports healthy microfauna. All in all, if you want your bioactive substrate system to last for a long time, Josh’s Frogs ABG is the way to go!
Installing the ABG layer is easy peasy! Here at Josh’s Frogs we like to make our products fun and eye-catching, so we typically leave our ABG mix in layers in the bag. The first task is to mix these layers up. The easiest way I have found is to simply dump the ABG in a 5 gallon bucket and toss it around until it is completely mixed up. You can also try to mix it in the bag , but extra space may be a little tight.
Grab your mister and mist the walls of the vivarium. Press the substrate barrier into the wall so that it lightly sticks. Scoop the ABG onto the Barrier and flatten the ABG as you're adding it, pressing outward near the edges occasionally to ensure the barrier is snug against the wall of the tank. Once you have your ABG layer installed and flattened, mist the sides down to rinse any debris from the false bottom or ABG.
In 2023, we rolled out a more eco-friendly version of ABG, specifically for dart frogs—Josh's Frogs DART FROG BioBedding Bioactive Substrate. This product won us 2nd place in the Global Pet Expo's New Product Showcase!
Sphagnum Moss
The next substrate is a 1/2 to 1 inch layer of sphagnum moss. This layer is very important because it keeps the frogs away from the abrasive materials in the ABG and drainage layer. It also helps to evaporate water into the air to maintain humidity in the tank. The sphagnum moss layer also plays a significant role by providing a habitat for small creatures like springtails and isopods.
Before installing this layer, soak the sphagnum moss to re-hydrate it. Submerge in water for 2-4 hours to ensure the moss is completely saturated. Put on your gloves—this moss can come in with thorns and branches that can really hurt! Wearing gloves will help alleviate some of the potential pain of encountering any of these items.
If there is any of the substrate barrier still exposed along the wall simply fold it down over the ABG mix. Wring out the sphagnum moss until it stops dripping water when you release it and spread the moss across the ABG. Make sure the it's spread evenly so that all of the ABG is covered. I like to take a little extra and line the walls with about an extra inch and press it down tight so that it seals the sides.
Once your layer is down, press the rest of the sphagnum moss firmly so that it is lightly packed.
Leaf Litter
This last step is potentially the easiest and most fun part of this substrate layering system. It’s the leaves! Toss them in like confetti on my birthday (Yes, I require confetti along with my cake and ice cream). Just like the cool fall winds of Michigan, there is no rhyme or reason on how the leaves are scattered. Simply create a chaos of falling leaves for the frogs to hide in.

After all your hard work, you have now successfully installed the substrate layering system! With the addition of live plants and microfauna, your vivarium will hold a cycling ecosystem designed for the health and happiness of your dart frogs. Learn more about plants in your bioactive system here: Plants in Your Bioactive Dart Frog Vivarium
Learn the benefits and additions of microfauna to your bioactive terrarium here: Microfauna in Your Bioactive Dart Frog Vivarium
Topics in this Blog
1-800-691-8178

Our Team
Josh's Frogs ©2020 - 2026 by Josh's Frogs, LLC.