Josh's Frogs
Why you should buy from us
How to Plant Epiphytes in a Vivarium
Epiphytic plants, or those plants that grow without soil (in the traditional sense), have always held a special place in the naturalistic vivarium. Many plants grow as epiphytes, but a few primary groups are commonly encountered in the home vivarium—namely, bromeliads, orchids, and some species of ferns. All of these plants appreciate air flow, a light/no substrate, and high light levels.
This article will discuss the primary ways of mounting epiphytes in a naturalistic vivarium—utilizing net pots built into the background, mounting on the background utilizing bamboo skewers, tying plants onto a surface, and mounting bromeliads using a stolon.
Utilizing Net Pots Built Into the Background
This is probably the easiest way to plant an epiphyte, but does require some planning. Make sure you incorporate some net pots into the background during construction, as shown here. Taking this extra step early on makes planting the vivarium much easier.

- Wrap the base of the epiphyte with moss. In this case, the epiphyte is a fern, so care is taken to ensure it's rhizomes (fuzzy roots) are above the substrate.
- Insert epiphyte into the net cup. If moss is not used (bromeliads and orchids prefer a well draining mix, such as ABG mix or tree fern fiber), put substrate into the net cup, then stick the plant in.
Using Bamboo Skewers/Toothpicks to Mount an Epiphyte
This technique works best on easily pierced background materials, such as Great Stuff backgrounds (click here to see how to build one) or tree fern panels.

- Wrap base of epiphyte in damp sphagnum moss. Stick a bamboo skewer into the background next to the plant at an angle, being careful not to stab the plant or roots.
- Stick a second bamboo skewer into the background on the other side of the epiphyte, so that it intersects the first bamboo skewer and pins the epiphyte to the background.
- Cut off excess parts of bamboo skewers, leaving just enough behind to pin the epiphyte to the background.
- Bamboo skewers should now be hidden. Ensure that the plant is securely mounted to the background and will not fall off.
- Dress with Josh's Frogs sheet moss. This greatly improves the appearance vs bare sphagnum moss, in my opinion!
- Thoroughly mist the epiphyte, and ensure that the moss is never allowed to completely dry out. Misting frequency and duration will depend on the type of plants and ventilation in the vivarium.
Tying an Epiphyte to a Surface
This is handy when attaching an epiphyte to a branch in a naturalistic vivarium. When using this technique, it is important to make sure that there is no slack in the string, and that there are no gaps between the loops that frogs could get tangled in.
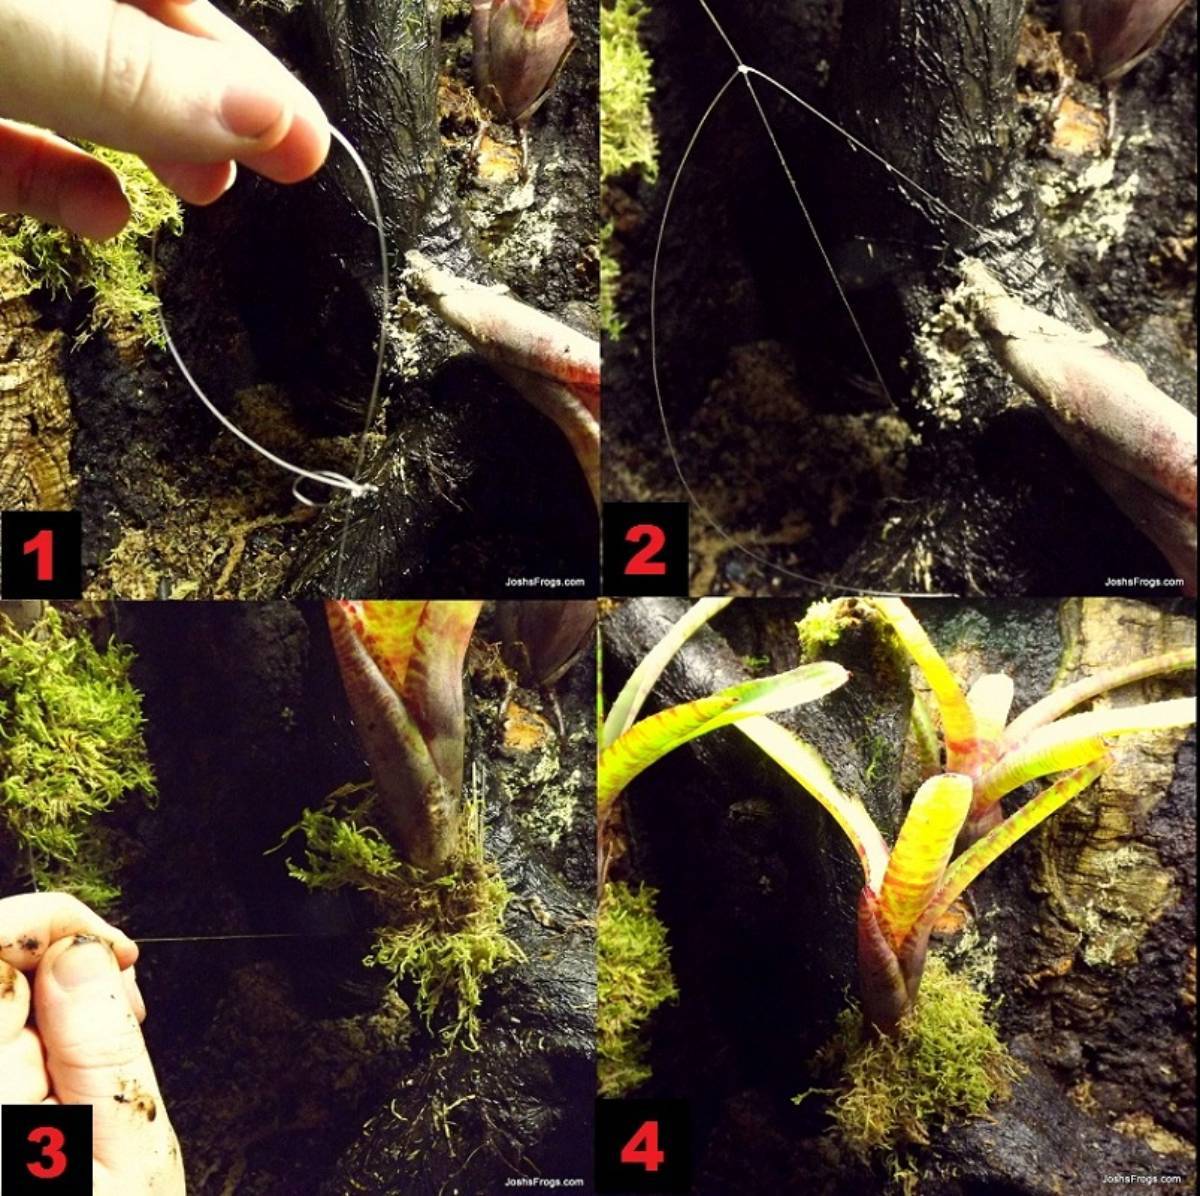
- Form a slip knot with your string of choice. Fishing line works well, as does black cotton thread.
- Wrap the string around the branch, then bring the loose end through the slip knot, making a loop.
- Wrap the epiphyte in damp sphagnum moss and place it where you want to mount it, then pull the string tight. Wrap the string around the branch several more times, then tie it off.
- Cut off excess string. If fishing line is used, remove it a few weeks later, after the epiphyte has rooted to the wood. If black cotton thread is used, it can be ignored as it will eventually rot away in the vivarium.
Mounting a Bromeliad in a Natural Crevice
Sometimes we get lucky, and a piece of vivarium wood or cork will simply have a natural crack or crevice in just the right spot to place an epiphyte. When Lady Luck smiles upon you in such a fashion, follow the simple steps below.

- Grab your bromeliad and trim the stolon (the woody stem sticking off the bottom of it) to the proper length. Remember, it's better to leave it too long and have to trim it again than to cut it too short the first time.
- Place the stolon in the natural crack or crevice. Push it all the way in, and gently jiggle the plant to ensure that it will not fall out.
- Pack moss (either long fiber sphagnum moss or Josh's Frogs Sheet Moss) around the base of the bromeliad, to encourage it to root into place.
Mounting a Bromeliad with a Stolon via a Drilled Hole
Sometimes, it is necessary to create a crevice to insert a bromeliad stolon into while planting a vivarium. This method is very similar to the one outlined above.

- Select a bromeliad with a stolon, and hold it in the vivarium where you'd like it to be mounted. Trim the stolon as necessary, and choose where a hole would best be drilled in order to mount the bromeliad.
- Using a power drill with a drill bit suitable for use on wood, carefully drill a hole to insert the bromeliad's stolon into. Take note to drill the hole at the proper angle, and make the hole slightly larger than the stolon.
- Place the bromeliad stolon into the hole. If the bromeliad does not fit securely, some moss can be added into the drill hole. Alternatively, the bromeliad may be tied into place as outlined above.
- Place moss around the base of the bromeliad to encourage the epiphyte to root into place.
Conclusion
Epiphytes, including orchids, bromeliads, and some ferns, will always hold a special place in the naturalistic vivarium. Due to their unique growth habits and required growing conditions, initially planting them may seem a bit of a challenge, but by following the various methods outlined above, even the novice vivarium designer can easily incorporate epiphytes into their planting regime.
Let Tamara show you How to Mount a Bromeliad onto a Cork Flat!
Topics in this Blog
1-800-691-8178

Our Team
Josh's Frogs ©2020 - 2026 by Josh's Frogs, LLC.