Josh's Frogs
Why you should buy from us
How to Make a Tree out of Cork Tubes
Ever imagine the perfect reptile or amphibian setup, then struggle with finding the ideal piece of wood to make your dream a reality? Let the creative critter keepers at Josh's Frogs show you how to make your very own terrarium tree out of cork tubes! The best part - built this way, the tree can be disassembled for easy cleaning!
First off, you'll need to gather some supplies. Everything you'll need is available at your local hardware store and on www.JoshsFrogs.com. You'll need:
From Hardware Store:1 x pvc cutters
1 x caulk gun
1 x 1"" diameter PVC pipe*
1 x 1 1/4"" diameter PVC pipe*
*length needed will vary, but generally those 2' sections most places sell will be enough
From Josh's Frogs:
Josh's Frogs Coco Cradle (any DRY coconut fiber will do)
From your Kitchen:
Serrated Steak Knife
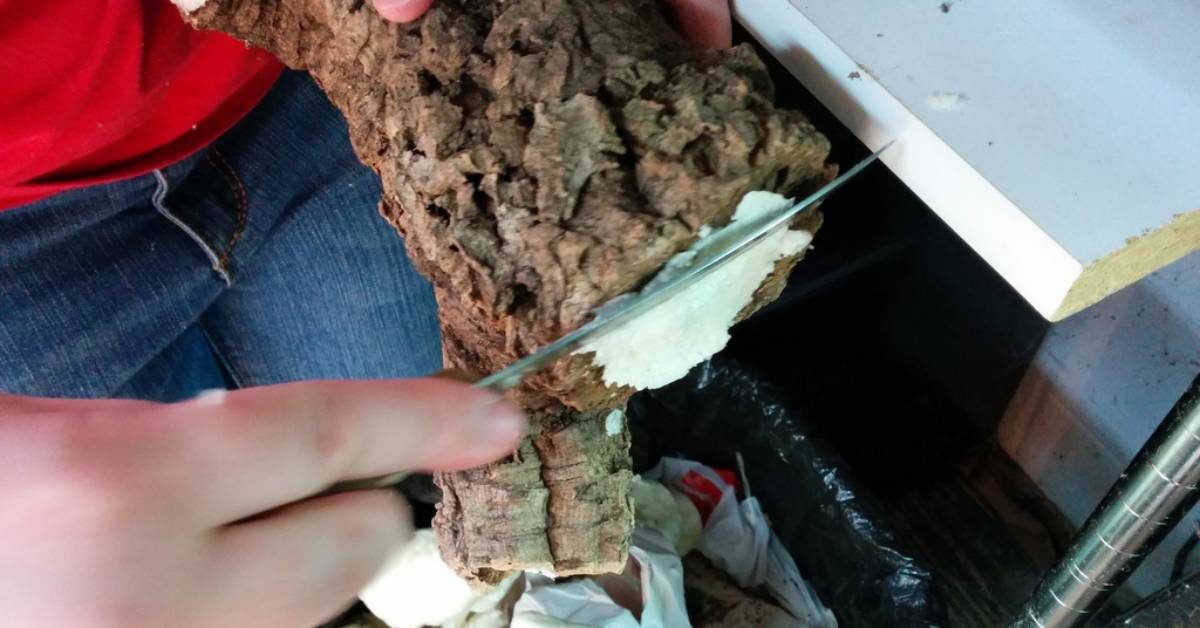
Step 1: Cutting the PVC
Dry fit the pvc into the open end or hole in the cork tubes you wish to connect. I've found that 1"" pcv easily slips inside of 1 1/4"" pvc without much wiggle room. You'll want the pvc to go as far in the cork tube as possible. Using the pvc cutters, cut the pvc, then position the pieces in the cork tubes as shown in the picture below.

Step 2: Foam the PVC in place
Using a can of Great Stuff foam, foam around the pvc, filling the inside of the cork tubes. This will make sure the pvc stays in place, and prevent your critters (or their feeders!) from entering the cork tube. When working with Great Stuff foam, make sure you protect your work surface with newspaper or something similar. Great Stuff is very sticky, and makes quite a mess if it gets on you. Gloves are not a bad idea!

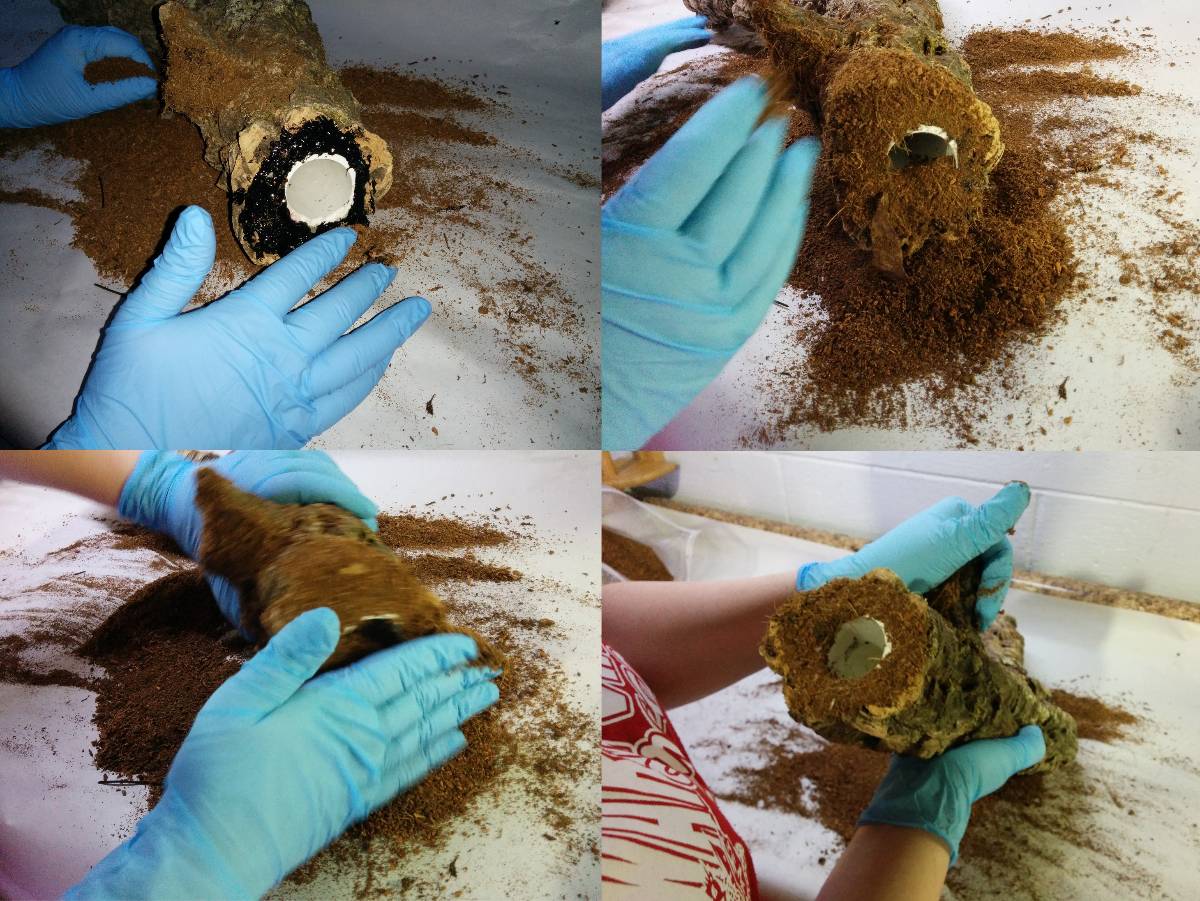
Step 3: Fill the rest of the hollow space with foam
In order to make sure your animals can't get into the cork and not get back out again (and to make it easier to remove the animals during cage cleaning or play time), fill the cork tubes with great stuff foam. This is not absolutely necessary, but makes keeping track of the animals much easier, and keeps crickets and other feeder insects from getting where they don't belong or where they cannot be eaten. Remember, if you do fill the cork tubes with foam, you'll want to provide alternative hiding places for the inhabitants. Keep in mind that the Great Stuff foam will expand as it cures - a little goes a long way!

Step 5: Let the Foam Cure
Let the cork tubes set for several days, to allow the foam to fully expand and cure. The foam may seem like it's cured after a few hours, but it's not! Patience is a virtue - practice it!

Step 6: Carve the Foam
After the foam has cured, it's time to carve it! Using the serrated steak knife, trim the dried foam so that it is flush with the cork tube. Remove as much excess foam as you can - this will make the next step much easier. You may wish to carve some of the foam at the end of a cork tube out so that it can hold a plant or food/water dish.
Step 7: Covering the Foam
This is the messiest step by far - wear gloves, possibly old clothes, and protect your work space with newspaper! Using the caulk gun, apply a generous amount of black vivarium safe silicone to the foam, then smear it over the surface of the foam with your gloved hand. While the silicone is still wet, apply DRY coconut fiber to the silicone (the coconut fiber will not stick well if it's wet). Repeat as needed, applying silicone and covering it a bit at a time, until the foam is no longer visible.
Step 8: More Curing
After the silicone is covered with coconut fiber and no foam is visible, leave the cork tubes alone for several days. Silicone has a vinegar smell to it as it cures - if, after 3-4 days there is no odor, it's most likely cured and ready for use!
Step 9: Assembly
Now, it's time to reap the fruits of your labor, and by fruits I mean one kick-butt terrarium centerpiece! Simply slip the pieces of cork tube together, so that the 1"" pvc fits snugly inside the 1 1/4"" pipe, place it in your terrarium, and admire!
 Step 10: Enjoy!
After the cork tree is built, it's time to add some naturalistic vivarium substrate, and get planting! For this vivarium, LED spotlights were used to ensure the plants receive adequate light 36"" down. A 24"" 5.0 HOT5 bulb provides UVB. Many plants were kept in pots, to make watering and removal for cleaning easier. The leachie vivarium was seeded with isopods to aid in waste control, then a young female leachie was introduced. She loves it!


Topics in this Blog
1-800-691-8178

Our Team
Josh's Frogs ©2020 - 2026 by Josh's Frogs, LLC.